|
|
| (4 intermediate revisions by 3 users not shown) |
| Line 4: |
Line 4: |
| </noinclude> | | </noinclude> |
| [[Image:Artwork_DesignService_fedora-iso-usb.png|right]] | | [[Image:Artwork_DesignService_fedora-iso-usb.png|right]] |
| 本页介绍 '''如何创建和使用Fedora启动U盘'''。 你可以使用一个Fedora启动U盘,在不安装Fedora系统到硬盘的情况下启动一台支持U盘启动的电脑。 你可以在启动U盘中划分一块区域存储你对系统的更改(安装软件或者修改配置), 这种模式被称为 ''持续覆盖''.你也可以划分一块单独空间用来存储你的用户账户信息和数据,比如你的文档和下载的文件,当然,为了数据安全你可以选择加密他们。最后,因为安装是非破坏性的,之前的文件和剩余的空间都可以在系统中访问。这相当于你把整个电脑装在口袋里,在你能找到的大部分机器上启动你自己的系统。
| |
|
| |
|
| 现在的Fedora版本中,你也可以把非自生Fedora镜像(DVD和网络安装镜像)写入U盘,有些用户觉得这样更方便,而且比写入光盘更快。
| | 本页介绍 '''如何创建并使用 Fedora 启动 U 盘'''。您可以将 [https://getfedora.org/ Fedora ISO 镜像] 写入 U 盘,在不安装 Fedora 系统到硬盘的情况下启动一台支持 U 盘启动的电脑。您可以在启动U盘中划分一块区域存储对系统的更改(安装软件或修改配置),这种模式称为 '''持续覆盖'''。您也可以划分一块单独空间用来存储用户账户信息和数据,比如文档和下载的文件,当然,为了数据安全您可以选择加密它们。总之,因为安装是非破坏性的,之前的文件和剩余的空间都可以在系统中访问。这相当于把整个电脑装在口袋里,在能找到的大部分机器上启动您自己的系统。 |
|
| |
|
| {{admon/note | Quick start | The process for most people is simple. Almost all USB sticks are provided by hardware manufacturers ready to use with this process. If you have any documents on your USB stick, it's not a bad idea to ''back them up'' before you start.
| | 在现在的 Fedora 版本中,您也可以把非 Live 版本的 Fedora 镜像(DVD 和网络安装镜像)写入 U 盘,这样比写入光盘更快更方便。 |
|
| |
|
| * Download the '''LiveUSB Creator''' program from http://fedorahosted.org/liveusb-creator if you're on Windows, or install on your Linux system using PackageKit or yum.
| | {{anchor|quickstarts}} |
| * Download the Live ISO image from http://fedoraproject.org/get-fedora.
| | {{anchor|fmw}} |
| * Insert your stick and run the '''LiveUSB Creator''' program.
| | {{anchor|luc}} |
| | == 快速开始:使用 Fedora Media Writer == |
| | [[Image:Fedora_Live_USB_creator.png|thumb|right|Fedora Media Writer 截图]] |
|
| |
|
| Then reboot your system and use your computer's built-in function to choose the USB boot device -- usually this is a special key you hold down at boot time, such as '''F12'''. Then enjoy!
| | 在大多数情况下,创建 Fedora U 盘的最佳工具是 [https://github.com/MartinBriza/MediaWriter Fedora Media Writer],以前称为 [http://fedorahosted.org/liveusb-creator LiveUSB Creator]。它目前支持 Fedora(其他发行版使用 [http://flatpak.org/ Flatpak]),Windows 和 macOS。 |
|
| |
|
| If you are into technical details or want more information on alternative tools and advanced usage, please read on.}}
| | {{admon/important | 破坏性方法 | 该方法将破坏 USB 存储设备中的所有数据。如果您需要非破坏性写入方法(以保留 U 盘上的现有数据)或支持 '持久化数据',您应该使用 [[#litd|livecd-iso-to-disk]] 实用工具。}} |
|
| |
|
| __TOC__
| | Fedora Media Writer 图形化工具非常易于使用。它可以下载最新版本的 Fedora 镜像,并将其写入 U 盘。 |
|
| |
|
| {{admon/important | Creating Live CD ISO image | A Live USB system is created from the same ISO image file that is used to create Live CD/DVD media. You can download ISO images for the official Fedora release from [http://fedoraproject.org/get-fedora the Fedora download site]. Consult [[How to create and use a Live CD]] for more information on creating your own customized ISO image file.}} | | 在 Fedora 中,您可以使用图形化软件安装工具安装 {{package|mediawriter}} 包,或使用以下命令安装: |
|
| |
|
| == 系统需求 == | | <pre> |
| | su -c 'dnf --enablerepo=updates-testing install mediawriter' |
| | </pre> |
|
| |
|
| * 一台使用GNU/Linux, Windows 或者 MacOS的电脑
| | 在 Windows 和 macOS 中,您可以从 [https://github.com/MartinBriza/MediaWriter/releases 发布页] 下载安装包。在其他 Linux 发行版,如果支持 [http://flatpak.org/ Flatpak] 应用分发系统,您可以从 [https://github.com/MartinBriza/MediaWriter/releases 发布页] 下载 flatpkg 包。 |
| *一个拥有1G以上存储空间的 [[wikipedia:USB flash drive|USB闪存设备]], 像U盘、存储卡等。
| |
| *一个Fedora镜像文件,你可以从http://fedoraproject.org/get-fedora 下载
| |
|
| |
|
| === 你的电脑是否允许从USB设备启动 ===
| | 要运行该工具,请在系统菜单中查找 '''Fedora Media Writer'''。当您启动 Fedora Media Writer 时,底部的三个点将闪烁,工具将检查新的 Fedora 版本。 |
|
| |
|
| 鉴于不同的BIOS的功能有所差别,部分电脑不能USB启动。如果你恰好在此列,考虑其他安装介质(光盘、硬盘等)。如果你不确定是否能够USB启动,又不介意下载并刻录Fedora镜像到你的USB设备(可能会擦除你的数据),不妨一试,最多浪费一点时间
| | 执行以下步骤写入 U 盘: |
|
| |
|
| | # 选择您希望安装或试用的 Fedora 版本。 |
| | #: 在标题页,您可以选择 Workstation, Server 或您的 .iso 文件。其他选项(包括 KDE, Cinnamon, Xfce 等等)在列表底部的 "..." 按钮中。 |
| | # 确保您的 U 盘已插入系统。 |
| | # 点击 ''Create Live USB''。 |
| | # 确保已选择右侧的 U 盘。 |
| | # 点击 ''Write to disk'' 并等待写入完成。 |
| | # 一旦写入完成,关闭系统并从 U 盘启动(参见 [[#booting|引导部分]])。 |
|
| |
|
| If your USB stick is not in working order, this procedure may fail. Watch for error messages during the process.
| | 写入后,您的 U 盘分区布局将改变,一些系统可能提示它有 10MB 容量。要将 U 盘恢复出厂设置,请在 Fedora Media Writer 运行时再次插入 U 盘。应用程序将提供恢复出厂设置的选项。恢复后,U 盘将包含一个 VFAT 分区。 |
|
| |
|
| === Sufficiently large USB stick ===
| | __TOC__ |
|
| |
|
| Many USB sticks indicate the size on the packaging or the outside of the stick.
| | = 系统需求 = |
|
| |
|
| If you don't know the size of the stick, or want to check it for data, you should be able to auto-mount the USB stick by inserting it into a USB port. You can check the contents and size using the graphical file manager. In Linux, you can also use the command {{command|df -h}}:
| | * 一台使用 GNU/Linux,Windows 或者 MacOS 的电脑。 |
| <pre>
| | * 一个拥有 1G 以上存储空间的 [[wikipedia:USB flash drive|USB闪存设备]],比如 U 盘、存储卡等 。 |
| $ df -h
| | * 1 个从 http://fedoraproject.org/get-fedora 下载的镜像文件。 |
| Filesystem Size Used Avail Use% Mounted on
| |
| /dev/mapper/VolGroup00-LogVol00 | |
| 143G 14G 122G 10% /
| |
| /dev/sda1 99M 12M 82M 13% /boot
| |
| tmpfs 1009M 0 1009M 0% /dev/shm
| |
| /dev/sdb1 3.9G 4.0K 3.9G 1% /media/usbdisk
| |
| </pre>
| |
|
| |
|
| USB drives are usually mounted in {{filename|/media}} or {{filename|/run/media/username/}}. In this case, the device is /dev/sdb1, has a 3.9GB capacity and is almost empty. As a rule of thumb, you should use a stick of at least 1GB to write a live image or network install image, and a stick of at least 4GB to write a DVD image.
| | {{anchor|booting}} |
| | == 从 USB 设备启动 == |
|
| |
|
| Take note of {{filename|/dev/sdb1}} or equivalent; you will be specifying the device name if you use the command line method. This is the string you substitute for USBPARTITIONNAME where it occurs in the instructions below.
| | [[Image:Bios_USB_boot.jpg|thumb|right|设置 USB 为第一引导设备。您的 BIOS 可能略有不同。]] |
|
| |
|
| == Optional: re-partition and format your USB stick ==
| | 几乎所有的现代 PC 都支持从 U 盘启动(有些非常老的可能无法启动)。当然,您需要设置从 USB 引导启动系统。首先,您需要按以下步骤操作: |
|
| |
|
| If you have a USB stick with a FAT-formatted partition that has a decent amount of free space, you can skip the repartitioning and formatting steps below, and simply continue with the following steps. This should allow you to add the Fedora live image to the stick without destroying any of the data already on it. However, '''it is highly recommended to make a backup copy of the data on the USB drive before proceeding''' in case something goes wrong.
| | # 关闭计算机。 |
| | # 插入 USB 设备。 |
| | # 移除所有其他便携式媒体,例如 CD, DVD, 软盘或其他 U 盘。 |
| | # 启动计算机。 |
| | # 如果计算机配置为从 USB 驱动器自动引导,您将看到屏幕显示 "Automatic boot in 10 seconds..."(如果您的计算机支持 UEFI 引导,这里会显示更多的 最小启动菜单)。 |
|
| |
|
| If you have any trouble trying the non-destructive installation path, try first to reset the master boot record, MBR, with the {{command|--reset-mbr}} option.
| | 如果计算机正常从硬盘驱动器引导,您需要手动配置 BIOS 从 U 盘驱动器引导。通常,应该按以下步骤操作: |
|
| |
|
| Occasionally, a filesystem can be damaged and re-partitioning and re-formatting before writing the stick may be necessary. Otherwise, it is [http://wiki.laptop.org/go/How_to_Damage_a_FLASH_Storage_Device recommended to keep the factory formatting] of flash media devices.
| | # 等待计算机安全重启。 |
| === How to re-partition ===
| | # 当计算机开始重启时,您需要仔细观察并按下指定按键(通常是 Escape, Tab, F12 或 Delete)进入引导设备选择菜单。如果您错过了,需要重启并重试。 |
| | # 进入 "BIOS" 或引导设备选择菜单,将您的 USB 设备设为第一启动项。 |
| | #: '''注意!''' 如果您修改了其他设置,可能会导致计算机无法启动。建议您记住修改的选项,以备不时之需。 |
| | # 保存更改,退出,从 USB 设备引导启动计算机。 |
|
| |
|
| {{admon/warning | CAUTION | This will erase all data on the USB drive! Please read the instructions below ''carefully''.}} | | 如果您的系统基于 [[Unified_Extensible_Firmware_Interface|UEFI]] 固件,它通常支持 UEFI 模式和 BIOS 兼容模式。如果您以 UEFI 模式启动并安装 Fedora,Fedora 引导将安装至 UEFI 分区(以 UEFI+GPT 模式启动)。如果您以 BIOS 兼容模式启动并安装 Fedora,Fedora 将以 BIOS+MBR 模式启动。更多信息,请参阅 [[Unified_Extensible_Firmware_Interface|UEFI 页]]。使用 [[#fmw|Fedora Media Writer]], [[#gnome|GNOME Disk Utility]], [[#dd|dd]], 或其他类似 dd 的工具,和 [[#litd|livecd-iso-to-disk]] 的 {{code|--efi}} 选项将 x86_64 镜像写入 U 盘,U 盘将支持 UEFI 引导。使用其他工具写入 U 盘可能不支持 UEFI 引导,并且 i686 镜像不支持通过 UEFI 引导。 |
|
| |
|
| {{admon/note | Skip if using command-line method | If you intend to use the livecd-iso-to-disk tool, documented below, you can skip this step and the ''How to Format'' step below, and simply pass the {{command|--format}} {{command|--msdos}} and {{command|--reset-mbr}} parameters to that tool if you need to re-partition and/or re-format the stick.}} <!-- msdos formatting is no longer the default. -->
| | == 检查 USB 磁盘大小 / 可用空间 == |
|
| |
|
| If the drive has not been partitioned properly (or if you are unsure), use {{command|fdisk}} to repartition it.
| | 如前所述,磁盘必须有一定的存储空间,具体取决于您选择的镜像。如果您使用破坏性方法,U 盘必须至少为镜像大小;如果使用非破坏性方法,它必须至少有足够的可用空间。无论您使用什么操作系统,都可以通过文件管理器检查设备可用空间,通常是右键单击并选择 ''Properties''。以下是 GNOME 文件管理器截图: |
|
| |
|
| Include only the drive name in the command, not the partition number. '''''Be sure to select the correct disk, or you may erase important data!''''' Check the output of "df -h" if you are unsure. For example, if your partition will be /dev/sdb1, do:
| | [[image:Properties_USB_size.png]] |
| <pre>
| |
| su -c 'fdisk /dev/sdb'
| |
| </pre>
| |
| If you don't have fdisk installed, run {{command| su -c 'yum install util-linux-ng'}} to install it.
| |
|
| |
|
| The following session output from {{command|fdisk}} shows the responses to give to the prompts. The line starting <code>Last cylinder ...</code> refers to the size of the flash drive, so may be different than in the example. The ''d'' command deletes an existing partition; the ''n'' command creates a new partition; the ''t'' command sets the type of a partition; and the ''w'' command commits your changes (at any point before running the ''w'' command, you can quit fdisk without any changes actually being made to the disk).
| | 您也可以通过执行 {{command|df -h}} 命令查看: |
| <pre> | | <pre> |
| Command (m for help): '''d''' | | /dev/sdX1 3.9G 4.0K 3.9G 1% /media/usbdisk |
| Selected partition 1
| |
|
| |
| Command (m for help): '''n'''
| |
| Command action
| |
| e extended
| |
| p primary partition (1-4)
| |
| '''p'''
| |
| Partition number (1-4): '''1'''
| |
| First cylinder (1-960, default 1): '''↵'''
| |
| Using default value 1
| |
| Last cylinder or +size or +sizeM or +sizeK (1-960, default 960): '''↵'''
| |
| Using default value 960
| |
|
| |
| Command (m for help): '''t'''
| |
| Selected partition 1
| |
| Hex code (type L to list codes): '''6'''
| |
| Changed system type of partition 1 to 6 (FAT16)
| |
|
| |
| Command (m for help): '''a'''
| |
| Partition number (1-4): '''1'''
| |
|
| |
| Command (m for help): '''w'''
| |
| The partition table has been altered!
| |
|
| |
| Calling ioctl() to re-read partition table.
| |
| | |
| WARNING: If you have created or modified any DOS 6.x
| |
| partitions, please see the fdisk manual page for additional
| |
| information.
| |
| Syncing disks.
| |
| </pre> | | </pre> |
| === How to re-format ===
| | 确保第一栏大于 1.0G。 |
|
| |
|
| {{admon/warning | CAUTION | This will erase all data on the USB drive! Please read the instructions below ''carefully''.}} | | {{anchor|#device}} |
| | {{anchor|device}} |
| | == 在 Linux 上通过 {{filename|/dev}} 名称标识设备 == |
|
| |
|
| To finish, the partition must be formatted with an actual file system using {{command|mkfs.vfat}} as the root user. Unmount the device before using {{command|mkfs.vfat}}. In the below example, {{filename|/dev/USBPARTITIONNAME}} might be, for example, {{filename|/dev/sdb1}}. '''''Be sure to select the correct partition; formatting destroys all data on it!'''''
| | 大多数 [[#writing|其他写入方法]] 都需要知道 U 盘的 {{filename|/dev}} 设备名称。例如,当使用 Linux 时可能为 {{filename|/dev/sdc}}。[[#fmw|Fedora Media Writer]] 不需要用户提供设备名。查找设备名可使用以下步骤: |
|
| |
|
| | # 插入 U 盘。 |
| | # 打开终端,运行 {{command|dmesg|grep removable}}。 |
| | # 在输出的最后,您会看到类似的信息: |
| <pre> | | <pre> |
| su -c 'umount /dev/USBPARTITIONNAME'
| | [32656.573467] sd 8:0:0:0: [sdX] Attached SCSI removable disk |
| su -c 'mkfs.vfat -F 32 -n usbdisk /dev/USBPARTITIONNAME'
| |
| </pre> | | </pre> |
| | 其中 sdX(可能是 sdb, sdc, sdd等)标签就是您需要使用的设备名。如果您连接了多个 USB 设备,请'''务必'''小心识别设备名,通常输出中会包含制造商名称或容量,可以使用这些来区分多个 USB 设备。'''记下这个标签''',下文我们称之为 ''sdX''。 |
|
| |
|
| If you don't have mkfs.vfat installed, run "yum install dosfstools" as root.
| | {{anchor|writing}} |
| | == 其他 U 盘写入方法 == |
|
| |
|
| == Download an ISO ==
| | 在大多数情况下,推荐使用 [[#fmw|Fedora Media Writer]]。在本节中,记录了其他有用的工具。 |
|
| |
|
| (If you intend to use the "Graphical" method below, with a supported Fedora release, you can skip this step. The program will download the ISO for you.) | | {{anchor|gnome}} |
| | === 使用 GNOME Disk Utility (Linux, 图形, 破坏性) === |
|
| |
|
| You can use BitTorrent or your web browser to download a bootable image, or ISO, which you will install on your USB drive.
| | {{admon/important | 破坏性方法 | 该方法会破坏 U 盘中的所有数据。如果您需要非破坏性方法(保留 U 盘中的数据)或需要 '持久化数据',您需要使用 [[#litd|livecd-iso-to-disk]]。}} |
|
| |
|
| Quick links:
| | 此方法适用于已安装 GNOME,Nautilus 和 GNOME Disk Utility 的 Linux(或 *nix)。如果您使用的是不支持 Flatpak 的发行版,这可能是最简单的方法。标准安装的 Fedora 或许多其他基于 GNOME 的发行版,都可以使用此方法。在 Fedora 上,确保已安装 {{package|nautilus}} 和 {{package|gnome-disk-utility}} 软件包。也可以使用其他桌面环境的图形化写入工具,或使用 [[#dd|命令行"直接写入"方法]]。 |
| * [http://fedoraproject.org/en/get-fedora Supported releases] | |
| * [http://fedoraproject.org/get-prerelease Pre-releases] (Alpha and Beta; redirects to previous supported release during pre-Alpha phase)
| |
| * [http://alt.fedoraproject.org/pub/alt/nightly-composes/desktop/ Nightly test composes]
| |
|
| |
|
| You are looking for a file with "Live" in the name, usually of the form {{filename|Fedora-<version>-<architecture>-Live-Desktop.iso}}. For example, {{filename|Fedora-{{FedoraVersionNumber}}-x86_64-Live-Desktop.iso}} is the {{FedoraVersion|short}} release for 64-bit Intel-compatible CPUs. Be sure to choose the correct file for your architecture. 32-bit releases will generally run on 64-bit hardware, but will not be optimized.
| | # 下载 Fedora 镜像,插入不包含任何有用数据的 U 盘 |
| | # 运行 Nautilus (Files) |
| | # 找到已下载的镜像,右键单击,转到'''Open With''',并点击 '''Disk Image Writer''' |
| | # 再次检查 U 盘,确保您真的不需要其中的数据! |
| | # 在 '''Destination''' 中选择您的 U 盘,并点击 '''Start Restoring...''' |
|
| |
|
| These instructions will also work for [[Spins Custom|Custom Spins]] of Fedora Live ISO images, including those you make yourself with Revisor (a graphical tool), or LiveCD Creator (command-line tool used by Revisor). (Pungi is a command-line tool you can use to create installable ISOs, but not Live ISOs.)
| | {{anchor|litd}} |
| | === 命令行方法:使用 ''livecd-iso-to-disk'' 工具 (仅 Fedora, 非图形, 破坏性/非破坏性) === |
|
| |
|
| If you use a LiveUSB with data persistence, you can use the "yum update" method described below to get the latest daily Rawhide RPMs (mostly for testers and not everyday use) [https://bugzilla.redhat.com/show_bug.cgi?id=446935 except for the kernel]. See [[Releases/Rawhide]] for more information about daily builds.
| | {{admon/important | 潜在破坏性方法 | ''如果使用 '''--format''' 参数'',该方法将破坏 U 盘中的所有数据。}} |
|
| |
|
| The nightly test composes will be built from the [[Releases/Branched|Branched]] release when there is one, and from [[Releases/Rawhide|Rawhide]] when there is no Branched.
| | {{command|livecd-iso-to-disk}} 方法的可靠性比 Fedora Media Writer 稍差,只能在 Fedora 中可靠地使用:它不能在 Windows 或 macOS 中使用,且不支持(通常失败)非 Fedora 发行版。但是,它支持 FMW 不支持的三个高级功能: |
|
| |
|
| == Write the stick ==
| | # 您可以使用 ''非破坏性'' 方法创建安装 U 盘,U 盘中的现有文件不会被销毁。该方法没有 ''破坏性 '' 写入方法可靠,且只在没有 U 盘可用时才使用。 |
| | # 写入 Live 镜像时,您可以使用 ''永久覆盖'' 功能,它允许在重启后保留之前的更改。您可以定期执行更新,就像使用磁盘中的系统一样。当然,内核更新需要 [[#Kernel updates|手动介入]];另外,[[#limited overlay|覆盖空间可能不足]]。不使用 ''永久覆盖'' 功能,每次启动时将丢弃之前的更改。 |
| | # 在 Live 镜像上,您也可以划分一个独立的区域来存储用户账户信息和数据,例如文档和下载的文件,可选的加密让您的数据更安全。 |
|
| |
|
| === Graphical Method - Windows or Fedora ===
| | 通过结合这些功能,您可以随身携带您的 Fedora 系统,并在任何计算机中启动。 |
|
| |
|
| Fedora USB sticks can be created in Windows and Linux using the [http://fedorahosted.org/liveusb-creator liveusb-creator] utility. Note that this utility is only capable of writing Live images. It is possible to write non-live images to a USB stick, but you must use one of the two command-line methods documented below. | | 在旧的 Fedora 系统中使用 {{command|livecd-iso-to-disk}} 写入新系统不是个好主意: |
| | 最好只写入一个版本,最多覆盖旧版本不超过两次。 |
|
| |
|
| For Windows using the following steps:
| | 请确保已安装 {{package|livecd-tools}} 软件包:{{command|su -c 'dnf install livecd-tools'}} |
| * Download liveusb-creator from [http://fedorahosted.org/liveusb-creator the site]
| |
| * Double click 'liveusb-creator'
| |
|
| |
|
| If you are using Fedora, you can use Add/Remove Programs and search for ''liveusb-creator'', or use the command line:
| | 基本示例如下。请注意首先[[#device|识别您的 U 盘设备名]]。在所有情况下,您可以添加参数{{command|--efi}}(尝试)以原生 UEFI 模式制作引导 U 盘。更详细的使用信息,请运行:{{command|livecd-iso-to-disk --help}} 或 {{command|man livecd-iso-to-disk}}。 |
| <pre>
| |
| su -c 'yum install liveusb-creator'
| |
| </pre>
| |
|
| |
|
| To start, run {{command|liveusb-creator}} on the command line, or on the GNOME menu, go to ''Applications -> System Tools -> liveusb-creator''.
| | 要将现有的 U 盘制作为可启动 U 盘,而不删除其中的任何数据,请确保在执行以下操作前未挂载 USB 驱动器,并在出现提示时输入 root 密码: |
| | : {{command|su -c "livecd-iso-to-disk Fedora-Workstation-Live-x86_64-{{FedoraVersionNumber|next}}-1.1.iso /dev/sdX"}} |
|
| |
|
| To use the tool, simply select a Fedora release to download from the drop-down box at top-right (or select an ISO you have already downloaded using the ''Browse'' button at top-left), select the USB stick to which you wish to write the image from the ''Target Device'' drop-down box, and hit the ''Create Live USB'' button.
| | 如果无法从使用上述方法创建的磁盘进行引导,则在重新分区和格式化前,重置为主引导记录: |
| | : {{command|su -c "livecd-iso-to-disk --reset-mbr Fedora-Workstation-Live-x86_64-{{FedoraVersionNumber|next}}-1.1.iso /dev/sdX"}} |
|
| |
|
| === Command Line Methods ===
| | {{admon/warning | 小心: | 在以下命令中使用 {{command|--format}} 选项,将擦除 USB 驱动器中的所有数据!请''仔细''阅读下面的说明。}} |
|
| |
|
| In the following examples, replace {{filename|/path/to/ISO}} with e.g. {{filename|Fedora-16-x86_64-Live-Desktop.iso}} or the full path to the ISO you downloaded, e.g. {{filename|/tmp/Fedora-16-x86_64-Live-Desktop.iso}}.
| | 如果有必要,您可以使用 ''livecd-iso-to-disk'' 重新分区和格式化目标设备: |
| | : {{command|su -c "livecd-iso-to-disk --format --reset-mbr Fedora-Workstation-Live-x86_64-{{FedoraVersionNumber|next}}-1.1.iso /dev/sdX"}} |
|
| |
|
| Replace {{filename|/dev/USBPARTITIONNAME}} with the appropriate partition name. For example, {{filename|/dev/sdb1}} in the example above ("Check the size of your USB drive"). '''''Be careful to specify the correct device, or you may lose important data!'''''
| | 使用 {{command|--home-size-mb}} 参数,可以为 {{filename|/home}} 划分保留的文件系统。例如: |
| | : {{command|su -c "livecd-iso-to-disk --home-size-mb 2048 Fedora-Workstation-Live-x86_64-{{FedoraVersionNumber|next}}-1.1.iso /dev/sdX"}} |
|
| |
|
| Both of these methods work with all Fedora images, not just live images: you can use {{command|dd}} or {{command|livecd-iso-to-disk}} to write a Fedora DVD or network installation ISO to a USB stick. However, for Fedora 15, non-live images cannot be written using {{command|dd}}.
| | 这将创建一个 2GiB 文件系统,每次启动 U 盘时挂载为 {{filename|/home}},从而允许您保留 {{filename|/home}} 中的数据。 |
|
| |
|
| ==== Using dd for a direct copy ====
| | 要启用 '数据持久性' 支持(对整个 Live 环境所做的更改将在引导期间持续存在),需要添加 {{command|--overlay-size-mb}} 参数,将持久性数据存储区域添加到目标设备。例如: |
| | : {{command|su -c "livecd-iso-to-disk --overlay-size-mb 2048 Fedora-Workstation-Live-x86_64-{{FedoraVersionNumber|next}}-1.1.iso /dev/sdX"}} |
|
| |
|
| {{admon/warning | CAUTION | This will erase all data on the USB drive! Please read the instructions below ''carefully''.}}
| | 其中 2048 是覆盖的期望大小(MB)。对于 VFAT,''livecd-iso-to-disk'' 工具不接受大于 4095 的值;对于 ext[234] 文件系统,只受可用空间的限制。 |
|
| |
|
| You can simply use dd (or similar direct imaging tools for other operating systems) to write a Fedora ISO to USB, although the specialized tools have additional features like non-destructive writing and data persistence. dd will always destroy any other data on the target stick, and cannot provide a persistent environment.
| | {{anchor|limited overlay}} |
| <pre>
| | {{admon/note | 持续覆盖的限制 | 由于目前的实现方式,对于持续覆盖的每次修改(写入和删除)都会占用它的可用空间,所以空间最终会被“用尽”,您的 U 盘将不能再启动(参见 [http://thread.gmane.org/gmane.linux.kernel.device-mapper.devel/14644 dm-devel 讨论] 和 [[LiveOS_image#Overlay_recovery|紧急恢复]])。您可以使用 {{command|dmsetup status live-rw}} 查看叠加层中剩余的空间:输出类似于 {{code|snapshot 42296/204800}},表示总共 204800 个 512 字节扇区,已消耗 42486 个。由于这些限制,建议谨慎使用系统级持久覆盖,仅进行配置更改和重要的安全更新。或者,如果有足够的可用磁盘空间,可以将 LiveOS 根文件系统快照的更改合并到新副本中。有关说明,请参阅 [[LiveOS image#Merge overlay into new image|该页面]]。}} |
| su -c 'dd if=Fedora-16-x86_64-Live-Desktop.iso of=/dev/sd''X'' bs=8M'
| |
| </pre>
| |
| | |
| On "OS X" something like this should work:
| |
| <pre>
| |
| sudo dd if=/Users/me/Downloads/Fedora-17-x86_64-DVD.iso of=/dev/disk999 bs=8388608
| |
| </pre>
| |
| | |
| Note that in this specific case you want the device name (e.g. /dev/sdb) not the partition name (e.g. /dev/sdb1).
| |
| | |
| An equivalent for Windows is the [http://www.chrysocome.net/rawwrite RawWrite for Windows tool]. It should be capable of writing Fedora images much as described above, but this is not regularly tested.
| |
| | |
| In Fedora versions prior to {{FedoraVersion|long|17}}, a DVD image written to a USB stick with dd or an equivalent tool will function as a network installation image unless a special kernel parameter is added on boot: it will be capable of performing an installation, but it will need to retrieve packages from network repositories, it will not be able to use the packages present on the stick. To allow the installer to find the packages present on the stick, use the [[Anaconda/Options#repo|anaconda ''repo='' parameter]], pointing to the USB stick by its device node, label or UUID. DVD images of {{FedoraVersion|long|17}} do not suffer from this limitation.
| |
|
| |
|
| ==== Using the {{command|livecd-iso-to-disk}} tool ====
| | 您可以组合 {{command|--home-size-mb}} 和 {{command|--overlay-size-mb}},这种情况下写入 {{filename|/home}} 的数据不会占用持久覆盖的空间。 |
|
| |
|
| The {{command|livecd-iso-to-disk}} is the most capable and often most reliable method of writing a Fedora ISO image to a USB stick, but can only reliably be used from within Fedora. It does not work in Windows and is not supported (and will usually fail) in non-Fedora distributions. Please use the liveusb-creator tool, dd (or an equivalent tool), or a third-party tool such as unetbootin on other operating systems. It is also not a good idea to try and write a new Fedora release using the version of {{command|livecd-iso-to-disk}} in a much older Fedora release: it is best to only use a release a maximum of two versions older than the release you are trying to write.
| | {{anchor|dd}} |
| | === 命令行 "直接写入" 方法 (多操作系统, 非图形, 破坏性) === |
|
| |
|
| {{command|livecd-iso-to-disk}} is usually available in the /LiveOS directory of the Live CD .iso file. You may loop mount the .iso, and procede as below, assured that you are using the version intended for your image: | | {{admon/important | 破坏性方法 | 该方法会破坏 U 盘中的所有数据。如果您需要非破坏性方法(保留 U 盘中的数据)或需要 '持久化数据',您需要使用 [[#litd|livecd-iso-to-disk]]。}} |
|
| |
|
| Make a mount point:
| | 此方法直接将镜像写入 U 盘,就像 [[#fmw|Fedora Media Writer]] 或 [[#gnome|GNOME Disk Utility]],但使用名为 {{command|dd}} 的命令行工具。与其他 “直接写入” 方法一样,它会破坏 U 盘中的所有数据,不支持任何高级功能,如数据持久性,但该方法非常可靠。 {{command|dd}} 工具可用于大多数类 Unix 操作系统,包括 Linux 和 macOS,以及 [http://www.chrysocome.net/dd 一个 Windows 版本]。如果您不能使用 Fedora Media Writer 或 GNOME 磁盘实用程序,或只是喜欢命令行程序,并想要一个简单/快速的方式写入 U 盘,这就是最好的方法。 |
| $ su -c "mkdir /tmp/live"
| |
|
| |
|
| Mount the .iso filesystem on your mount point:
| | # [[#device|识别您的 U 盘设备名]]。如果您使用 Windows,{{command|dd --list}} 命令将显示正确的名称。 |
| $ su -c "mount Fedora-16-x86_64-Live-Desktop.iso /tmp/live"
| | # '''卸载该设备所有已挂载的分区。''' 这非常重要,否则写入的镜像可能损坏。您可以使用 {{command|umount /dev/sdX*}} 命令卸载所有分区。 |
| | # 将 ISO 文件写入设备: |
| | #: {{command|1=su -c 'dd if=/path/to/image.iso of=/dev/sdX bs=8M status=progress oflag=direct'}} |
| | # 等待命令完成。 |
| | #: 如果您看到 {{code|dd: invalid status flag: 'progress'}},您的 dd 版本不支持 {{code|1=status=progress}} 选项,您需要删除该选项,然后重试(您将不能看到进度条)。 |
|
| |
|
| Confirm the availability of {{command|/LiveOS/livecd-iso-to-disk}}:
| | {{anchor|unetbootin}} |
| $ ls /tmp/live/LiveOS
| | === 使用 [http://unetbootin.sourceforge.net/ UNetbootin] (Windows, macOS 和 Linux, 图形, 非破坏性) === |
|
| |
|
| If the {{command|livecd-iso-to-disk}} script is not listed, your will need to obtain it from another source. Check if the livecd-tools RPM is installed with this command:
| | [[Image:Unetbootin_gtk3.png|thumb|right|Unetbootin 截图]] |
| rpm -q livecd-tools
| |
| You will see the name of the RPM and a version number if it is installed, or no output if it is not installed.
| |
|
| |
|
| If "livecd-tools" is not installed, install it using this command, or PackageKit:
| | {{admon/warning | 可靠性未知 | 每次发布版本,Fedora 的志愿者都会收到使用 UNetbootin 创建安装镜像的问题报告。使用最新版本的 UNetbootin 可以避免一些问题。UNetbootin 可以在某些情况下工作,但不能在其他情况下工作。例如,它会创建一个 BIOS 模式下可引导的 U 盘,但不支持 UEFI 模式。Fedora 不能保证支持 UNetbootin 写入的镜像。}} |
| $ su -c 'yum install livecd-tools'
| |
|
| |
|
| Detailed usage information is available in the first pages of the [http://git.fedorahosted.org/git/?p=hosted/livecd;a=blob;f=tools/livecd-iso-to-disk.sh;hb=HEAD#l27 livecd-iso-to-disk script], which you can also see by running {{command|su -c 'livecd-iso-to-disk --help'}}. Basic examples follow.
| | 虽然结果可能会有所不同,但通常情况下,使用 [[#fmw|Fedora Media Writer]], [[#litd|livecd-iso-to-disk]], [[#gnome|GNOME]] 和 [[#dd|dd]] 方法的结果比 UNetbootin 更好。如果您遇到 UNetbootin 的问题,请联系 UNetbootin 开发人员。 |
|
| |
|
| To make an existing USB stick bootable as a Fedora image without deleting any of the data on it, make sure that the USB drive is not mounted before executing the following, and give the root password when prompted:
| | UNetbootin 是一个图形化的可引导 U 盘镜像写入工具。它允许您保存 USB 驱动器中的任何数据。如果您在启动时遇到问题,可以尝试使用一个干净的 FAT32 格式的驱动器。 |
|
| |
|
| If {{command|livecd-iso-to-disk}} is available in the .iso filesystem,
| | 如果您运行的是 64 位 Linux 发行版,UNetbootin 可能无法运行,您需要安装相当多的 32 位系统库。Fedora 无法帮助您:请直接向 UNetbootin 开发人员反馈问题。 |
| $ su -c "/tmp/live/LiveOS/livecd-iso-to-disk Fedora-16-x86_64-Live-Desktop.iso /dev/USBPARTITIONNAME"
| |
| otherwise,
| |
| $ su -c "livecd-iso-to-disk Fedora-16-x86_64-Live-Desktop.iso /dev/USBPARTITIONNAME"
| |
| (See [[#Data persistence|Data persistence]] below for how to create Live USB devices with more than temporary storage of user files and settings.)
| |
|
| |
|
| In case it is not possible to boot from a disk created with the method shown above, before re-partitioning and re-formatting, often resetting the master boot record will enable booting:
| | # 从 [http://unetbootin.sourceforge.net/ UNetbootin 官方网站] 下载最新版本,并安装。在 Linux 中,下载可执行文件,添加可执行权限 {{command|chmod ugo+x filename}},运行即可。 |
| $ su -c "livecd-iso-to-disk --reset-mbr Fedora-16-x86_64-Live-Desktop.iso /dev/USBPARTITIONNAME"
| | # 启动 UNetbootin。在 Linux 中,需要输入 root 密码。 |
| | # 点击 '''Diskimage''',并选择您下载的 ISO 文件。 |
| | # 选择类型:USB 设备和 [[#device|选择正确的 USB 设备]] |
| | # 点击确定 |
|
| |
|
| {{admon/warning | CAUTION | The following method will erase all data on the USB drive! Please read the instructions below ''carefully''.}} | | {{admon/note | 设备不可见 | 如果您未看到 ''sdX'',您可能需要重新格式化设备。您可以使用大多数文件管理器或磁盘实用工具,例如,GNOME disk utility。建议使用 FAT32 格式。这会丢失您驱动器中的所有数据。}} |
| If necessary, you can have {{command|livecd-iso-to-disk}} re-partition and re-format the target stick. This is similar to performing the manual re-partitioning and re-formatting steps described earlier in this guide.
| |
| $ su -c "livecd-iso-to-disk --format --msdos --reset-mbr Fedora-16-x86_64-Live-Desktop.iso /dev/USBPARTITIONNAME"
| |
|
| |
|
| === UEFI boot of USB sticks === | | === 从运行的 Live 环境创建安装 U 盘 === |
|
| |
|
| Whether a Fedora image written to a USB stick will be bootable natively via UEFI is a somewhat complex question which depends on the Fedora release, the type of image (live or non-live), and the method used to write it. The {{command|--efi}} parameter to the {{command|livecd-iso-to-disk}} tool attempts to make a stick written with that tool natively UEFI bootable.
| | 如果您已运行在 Live CD, DVD, USB 环境。您可以执行以下命令,制作一个可引导 U 盘。 |
| | : {{command|su -c "livecd-iso-to-disk /run/initramfs/livedev /dev/sdX"}} |
|
| |
|
| As of {{FedoraVersion|long|17}}, all images written using the ''dd'' method should be UEFI-bootable, and all images written with {{command|livecd-iso-to-disk --format --reset-mbr --efi}} should also be UEFI-bootable. Use of {{command|--efi}} without {{command|--format}} and {{command|--reset-mbr}} can be considered a 'best effort', and may not produce a UEFI-bootable stick.
| | 在外部挂载根文件系统,请参阅 [[#Mounting a Live USB filesystem|该节]]。 |
|
| |
|
| === Data persistence === | | == 故障排除 == |
|
| |
|
| Data persistence means that your files and settings will remain even after you reboot your live system. You can perform updates just like a regular installation to your hard disk, except that kernel updates require [[#Kernel updates|manual intervention]] and [[#limited overlay|overlay space may be insufficient]]. The primary use of this feature is booting a USB stick with your live image as well as the persistent changes. Note that you will need to have space on your target USB stick for the live image plus your overlay plus any other data you want on the stick.
| | === Fedora Media Writer 问题 === |
|
| |
|
| Use the ''Graphical Method'' described above to do this easily. There is a graphical slider in the interface you can use to assign space on the target stick for persistent storage.
| | * 可以向 [https://github.com/MartinBriza/MediaWriter/issues GitHub] 或 [https://bugzilla.redhat.com/enter_bug.cgi?product=Fedora&component=mediawriter Bugzilla] 提交错误报告。 |
| | * 您可以 [http://bugz.fedoraproject.org/mediawriter 浏览已存在的 Bugzilla 报告]。 |
|
| |
|
| If using the {{command|livecd-iso-to-disk}} tool, add the {{command|--overlay-size-mb}} parameter to add a persistent data storage area to the target stick. For example:
| | === livecd-iso-to-disk 问题 === |
| <pre>
| |
| su -c "livecd-iso-to-disk --overlay-size-mb 512 Fedora-16-x86_64-Live-Desktop.iso /dev/USBPARTITIONNAME"
| |
| </pre>
| |
|
| |
|
| where 512 is the desired size (in megabytes) of the overlay. The [[livecd-iso-to-disk]] tool will not accept an overlay size value greater than 2047 for VFAT, but for ext[234] filesystems it is only limited by the available space.
| | ==== 分区未标记为可引导! ==== |
| {{anchor|limited overlay}}
| |
| {{admon/note | Limited Lifetime of Persistent Overlay | One very important note about using the "primary" persistent overlay for system changes is that due to the way it's currently implemented (as a LVM copy-on-write snapshot), every single change to it (writes AND deletes) subtracts from its free space, so it will eventually be "used up" and your USB stick will no longer boot (see this [http://thread.gmane.org/gmane.linux.kernel.device-mapper.devel/14644 dm-devel discussion] and [http://wiki.sugarlabs.org/go/LiveOS_image#Overlay_recovery this page] for emergency recovery). Because of these limitations, it is advisable to use the system-level persistence sparingly, for configuration changes and important security updates only. For a truly persistent write-many (vs write-once) overlay, use the ''--home-size-mb'' option to create a home directory filesystem image for personal files. Unlike the primary system overlay image, the home.img can be re-used and loop mounted outside of the liveusb environment.}}
| |
|
| |
|
| The persistent overlay status may be queried by issuing this command on the live system:
| | 如果您收到消息 {{code|Partition isn't marked bootable!}},您需要标记分区为可引导。为此,运行 {{command|su -c 'parted /dev/sdX'}},并使用 {{code|toggle N boot}} 命令(N 为分区号)。例如: |
| <pre>
| |
| dmsetup status live-rw
| |
| </pre>
| |
| The returned value may look like this:
| |
| <pre>
| |
| live-rw: 0 8388608 snapshot 42296/204800 176
| |
| </pre>
| |
| | |
| where the fraction after 'snapshot' for the logical volume is that of 512-byte sectors consumed in the overlay.
| |
| | |
| === From a running Live CD/DVD/USB ===
| |
| | |
| If you are already running a live CD, DVD, or USB and want to convert that into a bootable USB stick, run the following command:
| |
| | |
| su -c "livecd-iso-to-disk /run/initramfs/livedev /dev/USBPARTITIONNAME"
| |
| | |
| : (For versions before Fedora 17, use {{Code|/dev/live}} instead of {{Code|/run/initramfs/livedev}}.)
| |
| | |
| | |
| == How to Boot a Live USB Drive ==
| |
| | |
| * Power off the computer.
| |
| * Plug the USB drive into a USB port.
| |
| * Remove all other portable media, such as CD, DVD, or floppy disks.
| |
| * Power on the computer.
| |
| * If the computer is configured to automatically boot off of the USB drive, you will see a screen that says "Automatic boot in 10 seconds..." with a countdown.
| |
| * If the computer starts to boot off the hard drive, you'll need to manually configure it to boot off the USB drive.
| |
| ** Wait for a safe point to reboot safely.
| |
| ** As the machine starts to reboot, watch carefully for instructions on which key to press (usually a function key or Escape) to enter the boot device selection menu, or "BIOS setup". Press and hold that key. If you miss the window of opportunity (often only a few seconds) then reboot and try again.
| |
| ** Use the BIOS setup menu to put your USB drive first in the boot sequence. It might be listed as a hard drive rather than a removable drive. Each hardware manufacturer has a slightly different method for doing so. '''Use caution!''' Your computer could become unbootable or lose functionality if you change any other settings. Though these settings can be reverted, you'll need to remember what you changed in order to do so.
| |
| ** Save the changes, exit, and the computer should boot the Live USB drive.
| |
| | |
| == Problems and solutions ==
| |
| | |
| === liveusb-creator problems ===
| |
| | |
| * Try the [http://fedorahosted.org/liveusb-creator/wiki/FAQ liveusb-creator FAQ].
| |
| * Bugs are tracked in [https://fedorahosted.org/liveusb-creator/ Trac] - see e.g. [https://fedorahosted.org/liveusb-creator/report/1 existing tickets]. Please [https://fedorahosted.org/liveusb-creator/newticket open a new ticket] if you encounter any problems that have not already been reported.
| |
| * The [https://fedorahosted.org/mailman/listinfo/liveusb-creator liveusb-creator mailing list] has [https://fedorahosted.org/pipermail/liveusb-creator/ archives] which may also be useful.
| |
| | |
| === Partition isn't marked bootable! ===
| |
| | |
| If you get the following message, you need to mark the partition bootable.
| |
| <pre>
| |
| $ su -c "livecd-iso-to-disk Fedora-16-x86_64-Live-Desktop.iso /dev/USBPARTITIONNAME"
| |
| Partition isn't marked bootable!
| |
| You can mark the partition as bootable with
| |
| $ /sbin/parted /dev/sdb
| |
| (parted) toggle N boot
| |
| (parted) quit
| |
| Cleaning up to exit...
| |
| </pre>
| |
| | |
| To mark the partition bootable, run parted, and use the 'toggle X boot' command. For example:
| |
| <pre> | | <pre> |
| $ parted /dev/sdb | | $ parted /dev/sdb |
| Line 308: |
Line 223: |
| Using /dev/sdb | | Using /dev/sdb |
| Welcome to GNU Parted! Type 'help' to view a list of commands. | | Welcome to GNU Parted! Type 'help' to view a list of commands. |
| (parted) print | | (parted) print # 查看分区信息 |
| Model: Imation Flash Drive (scsi) | | Model: Imation Flash Drive (scsi) |
| Disk /dev/sdb: 1062MB | | Disk /dev/sdX: 1062MB |
| Sector size (logical/physical): 512B/512B | | Sector size (logical/physical): 512B/512B |
| Partition Table: msdos | | Partition Table: msdos |
| Line 317: |
Line 232: |
| 1 32.3kB 1062MB 1062MB primary fat16 | | 1 32.3kB 1062MB 1062MB primary fat16 |
|
| |
|
| (parted) toggle 1 boot | | (parted) toggle 1 boot # 标记分区1 为可引导 |
| (parted) print | | (parted) print # 查看分区信息 |
| Model: Imation Flash Drive (scsi) | | Model: Imation Flash Drive (scsi) |
| Disk /dev/sdb: 1062MB | | Disk /dev/sdX: 1062MB |
| Sector size (logical/physical): 512B/512B | | Sector size (logical/physical): 512B/512B |
| Partition Table: msdos | | Partition Table: msdos |
| Line 327: |
Line 242: |
| 1 32.3kB 1062MB 1062MB primary fat16 boot | | 1 32.3kB 1062MB 1062MB primary fat16 boot |
|
| |
|
| (parted) quit | | (parted) quit # 退出 |
| Information: Don't forget to update /etc/fstab, if necessary. | | Information: Don't forget to update /etc/fstab, if necessary. |
| </pre> | | </pre> |
|
| |
|
| === Partitions need a filesystem label! === | | ==== 分区需要文件系统标签! ==== |
|
| |
|
| If you get the following message, you need to label the partition.
| | 如果您收到消息 {{code|Need to have a filesystem label or UUID for your USB device}},您需要为分区设置标签:{{command|su -c "dosfslabel /dev/sdX LIVE"}} |
| <pre>
| |
| $ su -c "livecd-iso-to-disk Fedora-16-x86_64-Live-Desktop.iso /dev/USBPARTITIONNAME"
| |
| Need to have a filesystem label or UUID for your USB device | |
| Label can be set with /sbin/dosfslabel
| |
| Cleaning up to exit...
| |
| </pre>
| |
|
| |
|
| To label the partition:
| | ==== 分区有不同的物理/逻辑结束标记! ==== |
| <pre>
| |
| su -c "dosfslabel /dev/USBPARTITIONNAME LIVE"
| |
| </pre>
| |
|
| |
|
| === Partition has different physical/logical endings! ===
| | 如果您从 fdisk 获得该消息,您需要在写入镜像时,使用 {{code|--format}} 参数重新格式化 U 盘。 |
|
| |
|
| If you get this message from fdisk, you may need to reformat the flash drive, as described earlier in this guide.
| | ==== MBR 显示为空白! ==== |
|
| |
|
| === MBR appears to be blank! ===
| | 如果测试引导报告损坏的引导扇区,或者您收到消息 {{code|MBR appears to be blank.}},您需要在写入镜像时,使用 {{code|--reset-mbr}} 选项重设主引导记录(MBR)。 |
|
| |
|
| If your test boot reports a corrupted boot sector, or you get the following message, you need to install or reset the master boot record (MBR).
| |
| <pre> | | <pre> |
| $ su -c "livecd-iso-to-disk Fedora-16-x86_64-Live-Desktop.iso /dev/USBPARTITIONNAME" | | $ su -c "livecd-iso-to-disk Fedora-Workstation-Live-x86_64-{{FedoraVersionNumber|next}}-1.1.iso /dev/sdX" |
| MBR appears to be blank. | | MBR appears to be blank. |
| You can add an MBR to this device with | | You can add an MBR to this device with |
| Line 360: |
Line 265: |
| </pre> | | </pre> |
|
| |
|
| To install or reset MBR:
| | 重设主引导记录(MBR): |
| $ su -c "livecd-iso-to-disk --reset-mbr Fedora-16-x86_64-Live-Desktop.iso /dev/USBPARTITIONNAME"
| | <pre> |
| | $ su -c "livecd-iso-to-disk --reset-mbr Fedora-Workstation-Live-x86_64-{{FedoraVersionNumber|next}}-1.1.iso /dev/sdX" |
| | </pre> |
| | |
| | ==== 在其他 Linux 发行版使用 livecd-iso-to-disk ==== |
| | |
| | {{command|livecd-iso-to-disk}} 不能在非 Fedora 系统中运行。即使它在其他发行版可以运行并成功写入 U 盘,该 U 盘也可能无法引导。在其他非 Fedora 发行版上使用 {{command|livecd-iso-to-disk}} 不受支持,无法正常工作:请使用其他方法,例如 [[#fmw|Fedora Media Writer]]。 |
|
| |
|
| === Issues using other Linux distributions === | | === Ubuntu 的 ''usb-creator'' 命令 === |
| Ubuntu and derivative Linux distributions have a usb-creator program similar to Live USB Creator. This ''does not work'' with Fedora ISO images, it silently rejects them. usb-creator requires the ISO to have a Debian layout, with a /.disk/info file and a casper directory. Do not attempt to use this utility to write a Fedora ISO image. | |
|
| |
|
| The livecd-iso-to-disk script is not meant to be run from a non-Fedora system. Even if it happens to run and write a stick apparently successfully from some other distribution, the stick may well fail to boot. Use of livecd-iso-to-disk on any distribution other than Fedora is unsupported and not expected to work: please use an alternative method described above.
| | Ubuntu 及其衍生版有一个 {{command|usb-creator}} 程序,类似于 Fedora Media Writer。它'''不能'''用于写入 Fedora ISO 镜像。usb-creator 需要 ISO 具有 Debian 布局,具有 {{filename|/.disk/info}} 文件和 casper 目录。不要尝试使用该工具写入 Fedora ISO 镜像。 |
|
| |
|
| == Testing Live Image on USB == | | == 使用 qemu 测试可引导 U 盘 == |
|
| |
|
| You can test your Live Image on USB using QEMU as shown in the screenshot below.
| | 以下截图展示了,使用 QEMU 测试可引导 U 盘。 |
|
| |
|
| [[Image:FedoraLiveCD_USBHowTo_usb_flash_with_qemu.png|thumb]] | | [[Image:Screenshot_qemu_gtk3.png|thumb]] |
|
| |
|
| For example, if your USB flash drive is {{filename|/dev/sdb}}, you could type the following commands:
| | 例如,使用以下命令测试可引导 U 盘: |
| <pre> | | <pre> |
| su -c 'umount /dev/sdb1' | | su -c 'umount /dev/sdX1' |
| qemu -hda /dev/sdb -m 1024 -vga std | | qemu -hda /dev/sdX -m 1024 -vga std |
| </pre> | | </pre> |
| == Mounting a Live USB filesystem ==
| |
|
| |
|
| You can use the [http://git.fedorahosted.org/git?p=hosted/livecd;a=blob_plain;f=tools/liveimage-mount;hb=HEAD '''''liveimage-mount'''''] script in the {{package|livecd-tools}} package to mount an attached Live USB device or other LiveOS image, such as an ISO or Live CD. This is convenient when you want to copy in or out some file from the LiveOS filesystem on a Live USB, or just examine the files in a Live.iso or Live CD.
| | == 挂载 Live USB 文件系统 == |
| | |
| | 您可以尝试使用 {{package|livecd-tools}} 包中的 [https://github.com/rhinstaller/livecd-tools/blob/master/tools/liveimage-mount ''liveimage-mount''] 脚本,来挂载 Live USB 设备或其他 LiveOS 镜像,例如 ISO 或 Live CD。 |
| | 当您需要在 Live USB 上的 Live 文件系统中复制某些文件,或查看 Live ISO 或 Live CD 中的文件时,使用该脚本很方便。 |
| | |
| | == 为使用 ''livecd-iso-to-disk'' 持久覆盖模式写入的镜像更新内核 == |
|
| |
|
| == Kernel updates ==
| | 如果您的 U 盘有 [[#limited overlay|足够的覆盖空间]] 来更新内核,内核和 initramfs 将会被安装至 /boot 目录。要将它们投入使用,必须将它们移动到安装分区的 /syslinux 目录。该目录可以在运行的 Live USB 文件系统的 /run/initramfs/live 挂载点下面找到。新的 initramfs (例如 initramfs-4.8.1-1.fc25.x86_64.img)和内核(例如 vmlinuz-4.8.1-1.fc25.x86_64)应该被分别移动并替换 /run/initramfs/live/syslinux/initrd0.img 和 /run/initramfs/live/syslinux/vmlinuz0 文件。 |
|
| |
|
| If you have [[#limited overlay|sufficient overlay space]] to accommodate a kernel update on a Live USB installation, the kernel and initramfs will be installed to the /boot directory. To put these into service they must be moved to the /syslinux directory of the installation partition. This is accessible from the running Live USB filesystem at either the /mnt/live or /run/initramfs/live mount point. The new initramfs (such as initramfs-3.3.2-6.fc16.x86_64.img) and kernel (such as vmlinuz-3.3.2-6.fc16.x86_64) should be moved to replace the /mnt/live/syslinux/initrd0.img and /mnt/live/syslinux/vmlinuz0 files, respectively.
| | * '''注意''': ''[[dracut]]'' 默认不再包含 ''dmsquash-live'' 模块。从 Fedora 19 开始, ''dracut'' 默认设为 {{command|hostonly="yes"}} 选项,它排除了 ''dmsquash-live'' 模块。因此,可以在更新内核之前,以 root 用户身份添加 dracut 配置文件: |
| * '''Note''': Beginning with Fedora 17, [[dracut]] no longer includes the dmsquash-live module by default. So one should include it in {{Code|/etc/dracut.conf}} with, for example,<br><pre># echo 'add_dracutmodules+=" dmsquash-live "' >> /etc/dracut.conf</pre> | | <pre> |
| | echo 'hostonly="no" |
| | add_dracutmodules+=" dmsquash-live " |
| | compress="xz"' > /etc/dracut.conf.d/01-liveos.conf |
| | </pre> |
|
| |
|
| The following commands will move the new kernel and initramfs files and create symbolic links to them, in case one later wants to perform a full install of the image to a hard disk.
| | 以下命令将新的内核和 initramfs 文件移动到设备的 /syslinux 目录: |
| bootpath=run/initramfs/live/syslinux
| | <pre> |
| # bootpath=mnt/live/syslinux
| | bootpath=run/initramfs/live/syslinux |
| new=3.3.2-6.fc16.x86_64
| | new=4.8.1-1.fc25.x86_64 |
| | |
| | cd / |
| | mv -f boot/vmlinuz-$new ${bootpath}/vmlinuz0 |
| | mv -f boot/initramfs-${new}.img ${bootpath}/initrd0.img |
| | </pre> |
|
| |
|
| cd /
| | {{admon/note | Fedora 指南 | 本指南中记录的程序也记录在 http://docs.fedoraproject.org/readme-burning-isos/ 。指南中的内容可能与文档不同。如果您在编辑此网页或发现指南有问题,请根据指南提交错误,以便更新其内容。}} |
| mv -f boot/vmlinuz-$new ${bootpath}/vmlinuz0
| |
| mv -f boot/initramfs-${new}.img ${bootpath}/initrd0.img
| |
|
| |
| ln -fs -T ../${bootpath}/vmlinuz0 boot/vmlinuz-$new
| |
| ln -fs -T ../${bootpath}/initrd0.img boot/initramfs-${new}.img
| |
|
| |
|
| == See also ==
| | <noinclude> |
| [http://www.redhatmagazine.com/2007/11/07/i-am-fedora-and-so-can-you/ Red Hat Magazine | I am Fedora, and so can you!] | | [[Category:LiveMedia]] |
| | </noinclude> |
|
| |
|
| == References == | | = 参考 = |
|
| |
|
| * http://www.redhat.com/archives/fedora-test-list/2007-May/msg00308.html | | * http://www.redhat.com/archives/fedora-test-list/2007-May/msg00308.html |
| * http://www.redhat.com/archives/fedora-livecd-list/2007-April/msg00029.html | | * http://www.redhat.com/archives/fedora-livecd-list/2007-April/msg00029.html |
| | * [http://www.redhatmagazine.com/2007/11/07/i-am-fedora-and-so-can-you/ Red Hat Magazine | I am Fedora, and so can you!] |
本页介绍 如何创建并使用 Fedora 启动 U 盘。您可以将 Fedora ISO 镜像 写入 U 盘,在不安装 Fedora 系统到硬盘的情况下启动一台支持 U 盘启动的电脑。您可以在启动U盘中划分一块区域存储对系统的更改(安装软件或修改配置),这种模式称为 持续覆盖。您也可以划分一块单独空间用来存储用户账户信息和数据,比如文档和下载的文件,当然,为了数据安全您可以选择加密它们。总之,因为安装是非破坏性的,之前的文件和剩余的空间都可以在系统中访问。这相当于把整个电脑装在口袋里,在能找到的大部分机器上启动您自己的系统。
在现在的 Fedora 版本中,您也可以把非 Live 版本的 Fedora 镜像(DVD 和网络安装镜像)写入 U 盘,这样比写入光盘更快更方便。
快速开始:使用 Fedora Media Writer
在大多数情况下,创建 Fedora U 盘的最佳工具是 Fedora Media Writer,以前称为 LiveUSB Creator。它目前支持 Fedora(其他发行版使用 Flatpak),Windows 和 macOS。
破坏性方法 该方法将破坏 USB 存储设备中的所有数据。如果您需要非破坏性写入方法(以保留 U 盘上的现有数据)或支持 '持久化数据',您应该使用
livecd-iso-to-disk 实用工具。
Fedora Media Writer 图形化工具非常易于使用。它可以下载最新版本的 Fedora 镜像,并将其写入 U 盘。
在 Fedora 中,您可以使用图形化软件安装工具安装  mediawriter
su -c 'dnf --enablerepo=updates-testing install mediawriter'
在 Windows 和 macOS 中,您可以从 发布页 下载安装包。在其他 Linux 发行版,如果支持 Flatpak 应用分发系统,您可以从 发布页 下载 flatpkg 包。
要运行该工具,请在系统菜单中查找 Fedora Media Writer。当您启动 Fedora Media Writer 时,底部的三个点将闪烁,工具将检查新的 Fedora 版本。
执行以下步骤写入 U 盘:
- 选择您希望安装或试用的 Fedora 版本。
- 在标题页,您可以选择 Workstation, Server 或您的 .iso 文件。其他选项(包括 KDE, Cinnamon, Xfce 等等)在列表底部的 "..." 按钮中。
- 确保您的 U 盘已插入系统。
- 点击 Create Live USB。
- 确保已选择右侧的 U 盘。
- 点击 Write to disk 并等待写入完成。
- 一旦写入完成,关闭系统并从 U 盘启动(参见 引导部分)。
写入后,您的 U 盘分区布局将改变,一些系统可能提示它有 10MB 容量。要将 U 盘恢复出厂设置,请在 Fedora Media Writer 运行时再次插入 U 盘。应用程序将提供恢复出厂设置的选项。恢复后,U 盘将包含一个 VFAT 分区。
系统需求
从 USB 设备启动
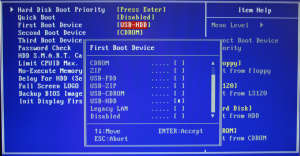
设置 USB 为第一引导设备。您的 BIOS 可能略有不同。
几乎所有的现代 PC 都支持从 U 盘启动(有些非常老的可能无法启动)。当然,您需要设置从 USB 引导启动系统。首先,您需要按以下步骤操作:
- 关闭计算机。
- 插入 USB 设备。
- 移除所有其他便携式媒体,例如 CD, DVD, 软盘或其他 U 盘。
- 启动计算机。
- 如果计算机配置为从 USB 驱动器自动引导,您将看到屏幕显示 "Automatic boot in 10 seconds..."(如果您的计算机支持 UEFI 引导,这里会显示更多的 最小启动菜单)。
如果计算机正常从硬盘驱动器引导,您需要手动配置 BIOS 从 U 盘驱动器引导。通常,应该按以下步骤操作:
- 等待计算机安全重启。
- 当计算机开始重启时,您需要仔细观察并按下指定按键(通常是 Escape, Tab, F12 或 Delete)进入引导设备选择菜单。如果您错过了,需要重启并重试。
- 进入 "BIOS" 或引导设备选择菜单,将您的 USB 设备设为第一启动项。
- 注意! 如果您修改了其他设置,可能会导致计算机无法启动。建议您记住修改的选项,以备不时之需。
- 保存更改,退出,从 USB 设备引导启动计算机。
如果您的系统基于 UEFI 固件,它通常支持 UEFI 模式和 BIOS 兼容模式。如果您以 UEFI 模式启动并安装 Fedora,Fedora 引导将安装至 UEFI 分区(以 UEFI+GPT 模式启动)。如果您以 BIOS 兼容模式启动并安装 Fedora,Fedora 将以 BIOS+MBR 模式启动。更多信息,请参阅 UEFI 页。使用 Fedora Media Writer, GNOME Disk Utility, dd, 或其他类似 dd 的工具,和 livecd-iso-to-disk 的 --efi 选项将 x86_64 镜像写入 U 盘,U 盘将支持 UEFI 引导。使用其他工具写入 U 盘可能不支持 UEFI 引导,并且 i686 镜像不支持通过 UEFI 引导。
检查 USB 磁盘大小 / 可用空间
如前所述,磁盘必须有一定的存储空间,具体取决于您选择的镜像。如果您使用破坏性方法,U 盘必须至少为镜像大小;如果使用非破坏性方法,它必须至少有足够的可用空间。无论您使用什么操作系统,都可以通过文件管理器检查设备可用空间,通常是右键单击并选择 Properties。以下是 GNOME 文件管理器截图:
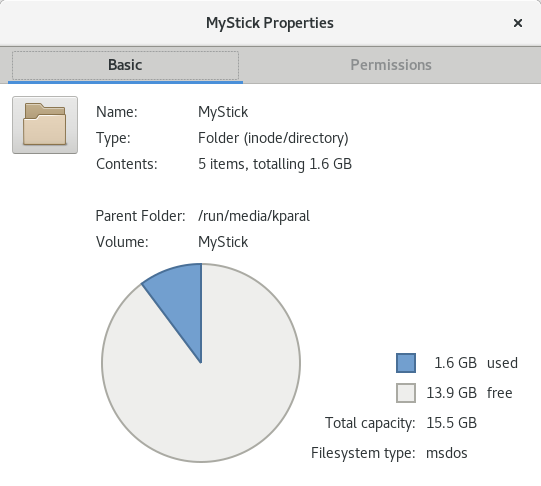
您也可以通过执行 df -h 命令查看:
/dev/sdX1 3.9G 4.0K 3.9G 1% /media/usbdisk
确保第一栏大于 1.0G。
在 Linux 上通过 /dev 名称标识设备
大多数 其他写入方法 都需要知道 U 盘的 /dev 设备名称。例如,当使用 Linux 时可能为 /dev/sdc。Fedora Media Writer 不需要用户提供设备名。查找设备名可使用以下步骤:
- 插入 U 盘。
- 打开终端,运行
dmesg。
- 在输出的最后,您会看到类似的信息:
[32656.573467] sd 8:0:0:0: [sdX] Attached SCSI removable disk
其中 sdX(可能是 sdb, sdc, sdd等)标签就是您需要使用的设备名。如果您连接了多个 USB 设备,请务必小心识别设备名,通常输出中会包含制造商名称或容量,可以使用这些来区分多个 USB 设备。记下这个标签,下文我们称之为 sdX。
其他 U 盘写入方法
在大多数情况下,推荐使用 Fedora Media Writer。在本节中,记录了其他有用的工具。
使用 GNOME Disk Utility (Linux, 图形, 破坏性)
此方法适用于已安装 GNOME,Nautilus 和 GNOME Disk Utility 的 Linux(或 *nix)。如果您使用的是不支持 Flatpak 的发行版,这可能是最简单的方法。标准安装的 Fedora 或许多其他基于 GNOME 的发行版,都可以使用此方法。在 Fedora 上,确保已安装 nautilus 和 gnome-disk-utility 软件包。也可以使用其他桌面环境的图形化写入工具,或使用 命令行"直接写入"方法。
- 下载 Fedora 镜像,插入不包含任何有用数据的 U 盘
- 运行 Nautilus (Files)
- 找到已下载的镜像,右键单击,转到Open With,并点击 Disk Image Writer
- 再次检查 U 盘,确保您真的不需要其中的数据!
- 在 Destination 中选择您的 U 盘,并点击 Start Restoring...
命令行方法:使用 livecd-iso-to-disk 工具 (仅 Fedora, 非图形, 破坏性/非破坏性)
潜在破坏性方法
如果使用 --format 参数,该方法将破坏 U 盘中的所有数据。
livecd-iso-to-disk 方法的可靠性比 Fedora Media Writer 稍差,只能在 Fedora 中可靠地使用:它不能在 Windows 或 macOS 中使用,且不支持(通常失败)非 Fedora 发行版。但是,它支持 FMW 不支持的三个高级功能:
- 您可以使用 非破坏性 方法创建安装 U 盘,U 盘中的现有文件不会被销毁。该方法没有 破坏性 写入方法可靠,且只在没有 U 盘可用时才使用。
- 写入 Live 镜像时,您可以使用 永久覆盖 功能,它允许在重启后保留之前的更改。您可以定期执行更新,就像使用磁盘中的系统一样。当然,内核更新需要 手动介入;另外,覆盖空间可能不足。不使用 永久覆盖 功能,每次启动时将丢弃之前的更改。
- 在 Live 镜像上,您也可以划分一个独立的区域来存储用户账户信息和数据,例如文档和下载的文件,可选的加密让您的数据更安全。
通过结合这些功能,您可以随身携带您的 Fedora 系统,并在任何计算机中启动。
在旧的 Fedora 系统中使用 livecd-iso-to-disk 写入新系统不是个好主意:
最好只写入一个版本,最多覆盖旧版本不超过两次。
请确保已安装 livecd-tools 软件包:su -c 'dnf install livecd-tools'
基本示例如下。请注意首先识别您的 U 盘设备名。在所有情况下,您可以添加参数--efi(尝试)以原生 UEFI 模式制作引导 U 盘。更详细的使用信息,请运行:livecd-iso-to-disk --help 或 man livecd-iso-to-disk。
要将现有的 U 盘制作为可启动 U 盘,而不删除其中的任何数据,请确保在执行以下操作前未挂载 USB 驱动器,并在出现提示时输入 root 密码:
su -c "livecd-iso-to-disk Fedora-Workstation-Live-x86_64-40-1.1.iso /dev/sdX"
如果无法从使用上述方法创建的磁盘进行引导,则在重新分区和格式化前,重置为主引导记录:
su -c "livecd-iso-to-disk --reset-mbr Fedora-Workstation-Live-x86_64-40-1.1.iso /dev/sdX"
小心:
在以下命令中使用 --format 选项,将擦除 USB 驱动器中的所有数据!请仔细阅读下面的说明。
如果有必要,您可以使用 livecd-iso-to-disk 重新分区和格式化目标设备:
su -c "livecd-iso-to-disk --format --reset-mbr Fedora-Workstation-Live-x86_64-40-1.1.iso /dev/sdX"
使用 --home-size-mb 参数,可以为 /home 划分保留的文件系统。例如:
su -c "livecd-iso-to-disk --home-size-mb 2048 Fedora-Workstation-Live-x86_64-40-1.1.iso /dev/sdX"
这将创建一个 2GiB 文件系统,每次启动 U 盘时挂载为 /home,从而允许您保留 /home 中的数据。
要启用 '数据持久性' 支持(对整个 Live 环境所做的更改将在引导期间持续存在),需要添加 --overlay-size-mb 参数,将持久性数据存储区域添加到目标设备。例如:
su -c "livecd-iso-to-disk --overlay-size-mb 2048 Fedora-Workstation-Live-x86_64-40-1.1.iso /dev/sdX"
其中 2048 是覆盖的期望大小(MB)。对于 VFAT,livecd-iso-to-disk 工具不接受大于 4095 的值;对于 ext[234] 文件系统,只受可用空间的限制。
持续覆盖的限制 由于目前的实现方式,对于持续覆盖的每次修改(写入和删除)都会占用它的可用空间,所以空间最终会被“用尽”,您的 U 盘将不能再启动(参见
dm-devel 讨论 和
紧急恢复)。您可以使用
dmsetup status live-rw 查看叠加层中剩余的空间:输出类似于
snapshot 42296/204800,表示总共 204800 个 512 字节扇区,已消耗 42486 个。由于这些限制,建议谨慎使用系统级持久覆盖,仅进行配置更改和重要的安全更新。或者,如果有足够的可用磁盘空间,可以将 LiveOS 根文件系统快照的更改合并到新副本中。有关说明,请参阅
该页面。
您可以组合 --home-size-mb 和 --overlay-size-mb,这种情况下写入 /home 的数据不会占用持久覆盖的空间。
命令行 "直接写入" 方法 (多操作系统, 非图形, 破坏性)
此方法直接将镜像写入 U 盘,就像 Fedora Media Writer 或 GNOME Disk Utility,但使用名为 dd 的命令行工具。与其他 “直接写入” 方法一样,它会破坏 U 盘中的所有数据,不支持任何高级功能,如数据持久性,但该方法非常可靠。 dd 工具可用于大多数类 Unix 操作系统,包括 Linux 和 macOS,以及 一个 Windows 版本。如果您不能使用 Fedora Media Writer 或 GNOME 磁盘实用程序,或只是喜欢命令行程序,并想要一个简单/快速的方式写入 U 盘,这就是最好的方法。
- 识别您的 U 盘设备名。如果您使用 Windows,
dd --list 命令将显示正确的名称。
- 卸载该设备所有已挂载的分区。 这非常重要,否则写入的镜像可能损坏。您可以使用
umount /dev/sdX* 命令卸载所有分区。
- 将 ISO 文件写入设备:
su -c 'dd if=/path/to/image.iso of=/dev/sdX bs=8M status=progress oflag=direct'
- 等待命令完成。
- 如果您看到 dd: invalid status flag: 'progress',您的 dd 版本不支持 status=progress 选项,您需要删除该选项,然后重试(您将不能看到进度条)。
使用 UNetbootin (Windows, macOS 和 Linux, 图形, 非破坏性)
可靠性未知
每次发布版本,Fedora 的志愿者都会收到使用 UNetbootin 创建安装镜像的问题报告。使用最新版本的 UNetbootin 可以避免一些问题。UNetbootin 可以在某些情况下工作,但不能在其他情况下工作。例如,它会创建一个 BIOS 模式下可引导的 U 盘,但不支持 UEFI 模式。Fedora 不能保证支持 UNetbootin 写入的镜像。
虽然结果可能会有所不同,但通常情况下,使用 Fedora Media Writer, livecd-iso-to-disk, GNOME 和 dd 方法的结果比 UNetbootin 更好。如果您遇到 UNetbootin 的问题,请联系 UNetbootin 开发人员。
UNetbootin 是一个图形化的可引导 U 盘镜像写入工具。它允许您保存 USB 驱动器中的任何数据。如果您在启动时遇到问题,可以尝试使用一个干净的 FAT32 格式的驱动器。
如果您运行的是 64 位 Linux 发行版,UNetbootin 可能无法运行,您需要安装相当多的 32 位系统库。Fedora 无法帮助您:请直接向 UNetbootin 开发人员反馈问题。
- 从 UNetbootin 官方网站 下载最新版本,并安装。在 Linux 中,下载可执行文件,添加可执行权限
chmod ugo+x filename,运行即可。
- 启动 UNetbootin。在 Linux 中,需要输入 root 密码。
- 点击 Diskimage,并选择您下载的 ISO 文件。
- 选择类型:USB 设备和 选择正确的 USB 设备
- 点击确定
设备不可见
如果您未看到 sdX,您可能需要重新格式化设备。您可以使用大多数文件管理器或磁盘实用工具,例如,GNOME disk utility。建议使用 FAT32 格式。这会丢失您驱动器中的所有数据。
从运行的 Live 环境创建安装 U 盘
如果您已运行在 Live CD, DVD, USB 环境。您可以执行以下命令,制作一个可引导 U 盘。
su -c "livecd-iso-to-disk /run/initramfs/livedev /dev/sdX"
在外部挂载根文件系统,请参阅 该节。
故障排除
Fedora Media Writer 问题
livecd-iso-to-disk 问题
分区未标记为可引导!
如果您收到消息 Partition isn't marked bootable!,您需要标记分区为可引导。为此,运行 su -c 'parted /dev/sdX',并使用 toggle N boot 命令(N 为分区号)。例如:
$ parted /dev/sdb
GNU Parted 1.8.6
Using /dev/sdb
Welcome to GNU Parted! Type 'help' to view a list of commands.
(parted) print  # 查看分区信息
Model: Imation Flash Drive (scsi)
Disk /dev/sdX: 1062MB
Sector size (logical/physical): 512B/512B
Partition Table: msdos

Number  Start   End     Size    Type     File system  Flags
 1      32.3kB  1062MB  1062MB  primary  fat16

(parted) toggle 1 boot  # 标记分区1 为可引导
(parted) print  # 查看分区信息
Model: Imation Flash Drive (scsi)
Disk /dev/sdX: 1062MB
Sector size (logical/physical): 512B/512B
Partition Table: msdos

Number  Start   End     Size    Type     File system  Flags
 1      32.3kB  1062MB  1062MB  primary  fat16        boot

(parted) quit  # 退出
Information: Don't forget to update /etc/fstab, if necessary.
分区需要文件系统标签!
如果您收到消息 Need to have a filesystem label or UUID for your USB device,您需要为分区设置标签:su -c "dosfslabel /dev/sdX LIVE"
分区有不同的物理/逻辑结束标记!
如果您从 fdisk 获得该消息,您需要在写入镜像时,使用 --format 参数重新格式化 U 盘。
MBR 显示为空白!
如果测试引导报告损坏的引导扇区,或者您收到消息 MBR appears to be blank.,您需要在写入镜像时,使用 --reset-mbr 选项重设主引导记录(MBR)。
$ su -c "livecd-iso-to-disk Fedora-Workstation-Live-x86_64-{{FedoraVersionNumber|next}}-1.1.iso /dev/sdX"
MBR appears to be blank.
You can add an MBR to this device with
Cleaning up to exit...
重设主引导记录(MBR):
$ su -c "livecd-iso-to-disk --reset-mbr Fedora-Workstation-Live-x86_64-{{FedoraVersionNumber|next}}-1.1.iso /dev/sdX"
在其他 Linux 发行版使用 livecd-iso-to-disk
livecd-iso-to-disk 不能在非 Fedora 系统中运行。即使它在其他发行版可以运行并成功写入 U 盘,该 U 盘也可能无法引导。在其他非 Fedora 发行版上使用 livecd-iso-to-disk 不受支持,无法正常工作:请使用其他方法,例如 Fedora Media Writer。
Ubuntu 的 usb-creator 命令
Ubuntu 及其衍生版有一个 usb-creator 程序,类似于 Fedora Media Writer。它不能用于写入 Fedora ISO 镜像。usb-creator 需要 ISO 具有 Debian 布局,具有 /.disk/info 文件和 casper 目录。不要尝试使用该工具写入 Fedora ISO 镜像。
使用 qemu 测试可引导 U 盘
以下截图展示了,使用 QEMU 测试可引导 U 盘。
例如,使用以下命令测试可引导 U 盘:
su -c 'umount /dev/sdX1'
qemu -hda /dev/sdX -m 1024 -vga std
挂载 Live USB 文件系统
您可以尝试使用 livecd-tools 包中的 liveimage-mount 脚本,来挂载 Live USB 设备或其他 LiveOS 镜像,例如 ISO 或 Live CD。
当您需要在 Live USB 上的 Live 文件系统中复制某些文件,或查看 Live ISO 或 Live CD 中的文件时,使用该脚本很方便。
为使用 livecd-iso-to-disk 持久覆盖模式写入的镜像更新内核
如果您的 U 盘有 足够的覆盖空间 来更新内核,内核和 initramfs 将会被安装至 /boot 目录。要将它们投入使用,必须将它们移动到安装分区的 /syslinux 目录。该目录可以在运行的 Live USB 文件系统的 /run/initramfs/live 挂载点下面找到。新的 initramfs (例如 initramfs-4.8.1-1.fc25.x86_64.img)和内核(例如 vmlinuz-4.8.1-1.fc25.x86_64)应该被分别移动并替换 /run/initramfs/live/syslinux/initrd0.img 和 /run/initramfs/live/syslinux/vmlinuz0 文件。
- 注意: dracut 默认不再包含 dmsquash-live 模块。从 Fedora 19 开始, dracut 默认设为
hostonly="yes" 选项,它排除了 dmsquash-live 模块。因此,可以在更新内核之前,以 root 用户身份添加 dracut 配置文件:
echo 'hostonly="no"
add_dracutmodules+=" dmsquash-live "
compress="xz"' > /etc/dracut.conf.d/01-liveos.conf
以下命令将新的内核和 initramfs 文件移动到设备的 /syslinux 目录:
bootpath=run/initramfs/live/syslinux
new=4.8.1-1.fc25.x86_64

cd /
mv -f boot/vmlinuz-$new ${bootpath}/vmlinuz0
mv -f boot/initramfs-${new}.img ${bootpath}/initrd0.img
参考


