Abstract
This page should provide "how-to" document about using Fedora Linux for developing applications for Android platform.
This document will cover requirements, steps how to go from source code till final application and how to use Android Emulator for testing of application.
Target Fedora version
F-12 and higher
Requirements
Android Emulator
- Eclipse IDE (3.5 and higher is needed because of ADT plugin dependency on Equinox P2) can be installed using DNF:
dnf install eclipse-jdt
Or with YUM:
yum install eclipse-jdt
- Android SDK
Download SDK from page
https://developer.android.com
Install ADT plugin for Eclipse
- Start Eclipse, then select Help > Install new software...
- Click on the Available Software site hyperlink.
- In Available software sites dialog, click Add....
- In the Add Site dialog that appears, enter a name for the remote site (for example "Eclipse Update") in the "Name" field. In the Location field, enter one of these URLs, depending on your version of Eclipse. For Eclipse version 3.5 use:
http://download.eclipse.org/releases/galileo/
or for Eclipse version 3.6 use:
http://download.eclipse.org/releases/helios/
For Eclipse version 3.7 (Fedora 16 and current Rawhide (as of Oct. 10, 2011)), use:
http://download.eclipse.org/releases/indigo/
For Eclipse version 4.2 (Fedora 17 and current Rawhide (as of Jun. 6, 2012)), use:
http://download.eclipse.org/releases/juno/
For Eclipse version 4.3 (Fedora 19 and current Rawhide (as of Jun. 5, 2013)), use:
http://download.eclipse.org/releases/kepler/
For Eclipse version 4.4 (Fedora 21 and current Rawhide (as of March 5, 2015)), use:
http://download.eclipse.org/releases/luna/
If you're unsure which version of Eclipse you are using, check it at Help > About Eclipse.
This will add dependency which are required for ADT plugin.
- Again click on Add button and enter a name for the another remote site (for example, "Android Plugin") in the "Name" field. In the "Location" field, enter this URL:
https://dl-ssl.google.com/android/eclipse/
Note: If you have trouble acquiring the plugin, you can try using "http" in the URL, instead of "https" (https is preferred for security reasons).Click OK.
- Click on each of the added sites and click Reload
- Back in the Available Software view, next to "Work with:", you should now see "Android Plugin" in the drop down list, select it. In the box below, you will see "Developer Tools" added to the list. Select the checkbox next to Developer Tools, this will automatically select the nested tools Android DDMS and Android Development Tools. Click Next.
- In the resulting Install Details dialog, the Android DDMS and Android Development Tools features are listed. Click Next to read and accept the license agreement and install any dependencies, then click Finish.
- Restart Eclipse.
Install Android SDK
- Download the SDK from [1]
- Unpack it in your home directory, then rename it to ~/AndroidSDK
- Add into path environment variable ~/AndroidSDK in .bash_profile file in your home directory.
For example:
PATH=$PATH:$HOME/AndroidSDK:$HOME/AndroidSDK/tools
export PATH

# For SDK version r_08 and higher, also add this for adb:
PATH=$PATH:$HOME/AndroidSDK/platform-tools
export PATH
- Logout and login back to apply path change
Android Emulator
32 bit packages
Install in Fedora 22 and later versions using DNF:
# dnf install glibc.i686 glibc-devel.i686 libstdc++.i686 zlib-devel.i686 ncurses-devel.i686 libX11-devel.i686 libXrender.i686 libXrandr.i686
Or with YUM in Fedora 21 and earlier versions:
# yum install glibc.i686 glibc-devel.i686 libstdc++.i686 zlib-devel.i686 ncurses-devel.i686 libX11-devel.i686 libXrender.i686 libXrandr.i686
AVD device
- cd into the ~/AndroidSDK directory and run tools/android to configure and create your first Android Virtual Device.
- Go to "Available Packages", select components for just those versions of Android you want to work with. For example:
- SDK Platform Android 2.1
- Documentation for Android SDK
- (SDK version r_08) For the adb tool, make sure you also select:
- Platform Tools
- Click on "Install selected", then click on "accept all" and confirm with clicking on "Install". This will start component installation, when it will be done, click on close. When this will be done, we could proceed with creation of AVD device itself.
- Go to "Virtual Devices", Click on "New", this will open screen where you need to specify SD card size (I will use 62MiB), name of device (I will use "android_dev1", target (Android 2.1, if you want to develop for different target, you need to go to step 2 and install SDK platform for different version).
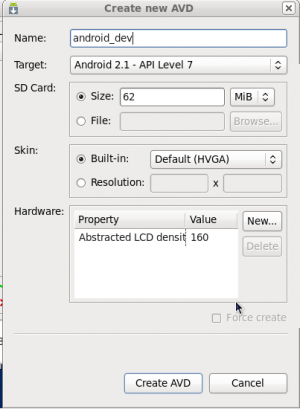
- Now click on "Create AVD" which will create Android Virtual Device.

Running Emulator
Now we have created Android Virtual Device and we should start it, however, due to issues in AndroidSDK with sound, we will need to run it from command line
./emulator -noaudio -avd android_dev1
And this will start emulator for us.
Hello Fedora
Configure Android in Eclipse
- Go to Window -> Preferences, click on Android and set SDK location to directory. (for example /home/user/AndroidSDK) and click on Apply.
- Click on apply to reload available targets
- choose target android SDK
- click on OK
Create a New Android Project
After you've created an AVD, the next step is to start a new Android project in Eclipse.
- From Eclipse, select File > New > Project. If the ADT Plugin for Eclipse has been successfully installed, the resulting dialog should have a folder labeled "Android" which should contain "Android Project". (After you create one or more Android projects, an entry for "Android XML File" will also be available.)
- Select "Android Project" and click Next.
- On next screen type Project Name ("HelloFedora"), Application name (Hello, Fedora), package name (com.example.hellofedora) which represent your namespace and name of activity in "Create Activity" box (HelloFedora). Choose target (if you have multiple targets) and click on "Finish". This will create project for you.

Development and Execution
- open HelloFedora.java and paste there example code from Hello Fedora Code section.
- click on windows -> preferences. In new window, open Android -> Launch and into "Options" text box insert "-noaudio"
- open separate console, cd ~/AndroidSDK/tools and execute ./emulator -noaudio @android_dev1 to start emulator. Wait for start of emulator (it could take several minutes)
- in eclipse, click on "run" and it will deploy application into Android Virtual Device.

Hello Fedora Code
package com.example.hellofedora;

import android.app.Activity;
import android.os.Bundle;
import android.widget.TextView;

public class HelloFedora extends Activity {
    /** Called when the activity is first created. */
    @Override
    public void onCreate(Bundle savedInstanceState) {
        super.onCreate(savedInstanceState);
        setContentView(R.layout.main);
        TextView tv = new TextView(this);
        tv.setText("Hello, Android Developer\n Thank you, for using Fedora Linux");
        setContentView(tv);

    }
}
Compiling Android from Source
Since Android is open source software, we can compile the platform ourselves on our Fedora machines. You need to have at least 6GB of disk space free to build Android.
- Make sure you have Java installed (Java <= 1.5 only for compiling Android <= 2.1). Preferably Sun Java rather than OpenJDK (OpenJDK should still work but issues are more likely to arise).
- Ensure that these required packages are installed using DNF or YUM:
dnf|yum install gcc gcc-c++ gperf flex bison glibc-devel.{x86_64,i686} zlib-devel.{x86_64,i686} ncurses-devel.i686 libsx-devel readline-devel.i686 perl-Switch
- Obtain the Android "repo" tool.
curl https://dl-ssl.google.com/dl/googlesource/git-repo/repo > ~/bin/repo
chmod a+x ~/bin/repo
- Create a directory for the Android source trees (We'll use ~/android/source in this example)
mkdir -p ~/android/source
cd ~/android/source
- Once in the directory, initialize the AOSP repository. (Only run one of these commands per directory)
# Initialize sources for the master branch of Android
repo init -u git://android.git.kernel.org/platform/manifest.git

# Initialize Cupcake (1.5)
repo init -u git://android.git.kernel.org/platform/manifest.git -b cupcake

# Initialize Donut (1.6)
repo init -u git://android.git.kernel.org/platform/manifest.git -b donut

# Initialize Eclair (2.0 - 2.1)
repo init -u git://android.git.kernel.org/platform/manifest.git -b eclair

# Initialize Froyo (2.2)
repo init -u git://android.git.kernel.org/platform/manifest.git -b froyo

# Initialize Gingerbread (2.3)
repo init -u git://android.git.kernel.org/platform/manifest.git -b gingerbread
- Now you need to start downloading the source trees from git, while in ~/android/source run:
repo sync
- Before you can start building for your device, you will need to acquire some proprietary files directly from your device using the adb tool. There will be a script to do this in your device's configuration directory. While still in ~/android/source do:
# I.e for the Nexus One this would be "device/htc/passion"
cd device/<device_manufacturer>/<device_codename>

# The script name *should* be the same in all the devices directories...
./extract-files.sh
- To build the Android platform, the process is generally like this:
cd ~/android/source
source build/envsetup.sh
lunch      # <- (choose your device from the list)

# To build .img files of the platform (you will need to 'fastboot' these onto a device that supports fastboot):
make

# To build an OTA (Over The Air) package (zip files that carriers send out to devices for updates):
make otapackage

# To build a specific component, for example the Camera application:
make Camera
- All output from the build process will be located in the directory contained by the shell variable $OUT (the $OUT directory will be different based on what product you lunched earlier). $OUT will generally be something like ~/android/source/out/target/product/<yourdevicename>
- If your device is not in the 'lunch' list, it's because there is no official open source device config for your particular device. For example, at this point in time, the only device configs that come with the source trees, are the G1 (dream), MyTouch (sapphire), Nexus One (passion), and Nexus S (crespo). This is because they are directly related with Google and therefore just as open source as the rest of the platform.
- If none of these are your Android device, luckily for us, there are open source developers that work on creating these for various devices. What you want to do is obtain the configuration repo, and put it in ~/android/source/device. The easiest way to do this is to use 'git' (provided by the "Development Tools" dnf|yum group. Git can be installed with DNF by command
dnf install git). You can search http://github.com to see if anyone has started working on a config for your specific device. - Of course to install your finished build, your Android device must allow root access with a custom recovery image installed. It should also be noted that by compiling Android from the instructions above (building from the official Android repositories), the resulting build will not have native root access, nor will it have the official Google applications (Gmail, YouTube, Market, etc., these can be installed afterward). To build your own development build with superuser access enabled, some more configuration to the source would be needed and is out of the scope of this tutorial. You could also build from alternate Android source trees, such as CyanogenMod (http://github.com/CyanogenMod/android) (if your device is supported by their project).
--Hpejakle 11:25, 2 April 2010 (UTC)