From Fedora Project Wiki
Description
This test case tests whether pushing scratch builds from local SRPMs to Koji works as expected.
Setup
- Boot into the machine/VM you wish to test
- Ensure the
eclipse-fedorapackager-0.2.1-1.fc16package IS installed. Install it viayum install eclipse-fedorapackager-0.2.1-1.fc16. - Make sure that file
~/.fedora.certexists and your FAS SSH key is properly set up in Eclipse and the public key properly uploaded to the FAS account system.
How to test
- Open Eclipse and use a new workspace.
eclipse -data test_day_20111013_fpe_koji_local_srpm_builds - Press Ctrl+Alt+F I to open the import wizard. Alternatively press Ctrl+3 and start typing "Projects from Fedora Git", then press return.
- Enter the package name of a package you maintain or use package
 eclipse-fedorapackager
 - The package you've just cloned should show up in your workspace
- Expand the project you've cloned into your workspace and double-click the .spec file in it. The .spec file should open in the editor.
- Edit the .spec file and update the "Release:" field (e.g. increment the value by one) and add a new changelog entry.
- Press Ctrl+3, start typing "Changelog", select "Preferences (Changelog)" from the list and press return. Make sure your name and email is correctly set up in the preferences. Press OK to save preferences.
- Back in the .spec file press Ctrl+Alt+C, which should add a new changelog stub. Enter "Fedora Packager for Eclipse Test Day" as the message.
- Next, we need to create an SRPM in order to be able to use that for the Koji scratch build.
- Right-click in the .spec file, select "Fedora Packager" => "Create SRPM" or alternatively use Ctrl+Alt+F S. This will create an SRPM in the project folder of your cloned project. Also note the output in the "Console" view in Eclipse, with the absolute path to the SRPM which got created.
- Make sure the .spec file is in focus, press Ctrl+Alt+F U, select the SRPM we've just created and click "OK".
- This should trigger a Koji scratch build which should use the specified SRPM for the build.
Expected Results
- The SRPM should get uploaded to Koji and relevant progress information be shown.
- Once the upload finished, a Koji scratch build should be triggered.
- On successful Koji build submission you should see a message similar to this:
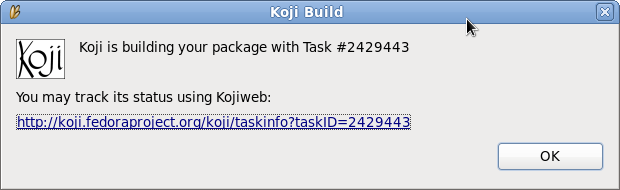
- Clicking the link as provided in the message dialog, should show the familiar Koji Web interface. Make sure user data and other task specific information is in order. In particular, make sure that the build you've just pushed is a scratch build and that it's building from the correct SRPM (e.g. make sure the correct release from the SRPM is being used).
